Admininistrator User Manual
Who is an “administrator”?
- A person who :
- helps to plan and oversee a project using KA Lite
- installs and updates KA Lite
- can create coach logins, Learner logins, download videos and language packs
Administrator Glossary
For users that choose to register online, there are some important terms to familiarize yourself with so that you understand how the flow of data works between installations and the online data hub.
- Sharing Network
- A sharing network is a group of devices that share data between one another. Data can mean video content, access software applications, and certain files.
- Organization
- An organization is a group of people responsible for administering a set of Sharing Networks. An organization can have multiple administrators and manage multiple sharing networks.
- Facility
- A facility is the physical space in which a device is located (e.g. a school or a computer lab in a community center). Learner, coach, and admin accounts are associated with a particular facility.
- Device
- A device should be able to run a KA Lite server (most computers) and other devices to be used as clients. One common configuration is using a Raspberry Pi or other inexpensive computer as a server and relatively cheap tablets as client devices. Tablets can access the servers through an access point, such as a Wi-Fi dongle, or some other networking device such as a router.
- Web Browser
- A program that retrieves and presents information resources on the World Wide Web. Popular web browsers include Internet Explorer, Google Chrome, Mozilla Firefox, and Safari.
- Torrent
- A file or files sent using the BitTorrent protocol. It can be any type of file, such as a movie, song, game, or application. During the transmission, the file is incomplete and therefore referred to as a torrent. Torrent downloads that are incomplete cannot be opened as regular files, because they do not have all the necessary data.
- Seeder
- Seeders are users who have a complete version of the file you wish to download. If there are no seeders for a particular file, you will not be able to download the file. Seeders are extremely important, for they help distribute the file.
- Bandwidth
- The amount of data that an Internet connection can handle in a given time. An Internet connection with larger bandwidth can move a certain amount of data much faster than an Internet connection with a lower bandwidth.
Running the KA Lite Server
After a successful installation of KA Lite, the terminal should give you a command to copy. It will look something like the following:
/PATH/TO/KALITE/bin/kalite start
The first string will vary depending on which folder you installed KA Lite in. Simply copy and paste the provided string back into the command prompt, and hit enter on your keyboard. You will be asked whether or not you wish to run the KA Lite server in the background automatically every time you start up the computer. Once you answer yes or no, success! The KA Lite server is now running on your computer.
During the process, your operating system might prompt you to allow “Python.app” to accept incoming connections. The message dialogue may look like the following, depending on your operating system:
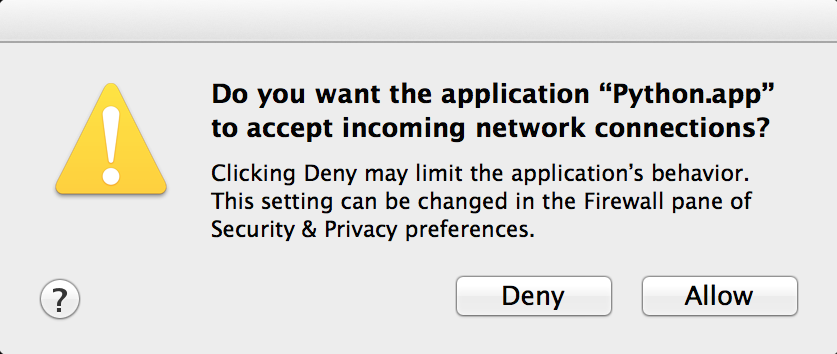
Please allow the app to run. This will make it possible for the KA Lite application to be accessible.
Accessing KA Lite
Once the server has been started, you will be given a few IP addresses. You can use these addresses to access KA Lite by copying and pasting them into a web browser of your choice.
In order to access KA Lite from another machine, please enter the IP address that does not start with http://127.0.0.1:8008 into the web browser on that machine.
Setting up KA Lite
Once you have successfully installed KA Lite, the installation script should give you a URL (http://127.0.0.1:8008/) to visit so that you can open KA Lite and login for the first time.
Copy and paste the URL into a web browser. The KA Lite application should show up. Then, login to KA Lite using the username and password you created during the installation process.

- If you have forgotten the username/password combination, simply run
bin/kalite manage createsuperuserfrom the kalite directory and then follow the instructions. If it is critical that you are able to login with your credentials, Contact Us and we can help you manually reset your login information.
Once you’ve logged in, the next step in the setup process is registering your device with the KA Lite Hub.
Registering Your Device with the Hub
By registering your device with FLE, you can sync data back with our central data hub. This is useful for many reasons:
- a project administrator can manage user accounts and view usage data from afar, without needing to physically visit the offline device.
- usage data syncing back can inform the FLE team of multiple users in a certain geographic region, and we can connect people that might be able to help one another
- it helps FLE and our partners understand where and how the software is being used, so we can keep adding features that support you!
You will have two options:
- One click registration. This is the perfect option for individual users who just want to get KA Lite up and running fast, and don’t need online access to data. This allows you to get the registration process over in one-click without worrying about creating a login that you’re never going to use. Caution: if you choose to one-click register, you will unable to register with online access to data later. (If you chose this option by accident and would like to start over, you can rerun the setup command by navigating to the folder KA Lite is in and rerunning the setup command).

- Register with online access to data. Choose this option if you’re an administrator of larger projects. This option allows you to access your uploaded data and connect multiple installations to the same account.


How to register your device with online access to data
Note
You will need Internet access in order to perform these steps.
- Log into KA Lite with the username and password that you set during set-up.
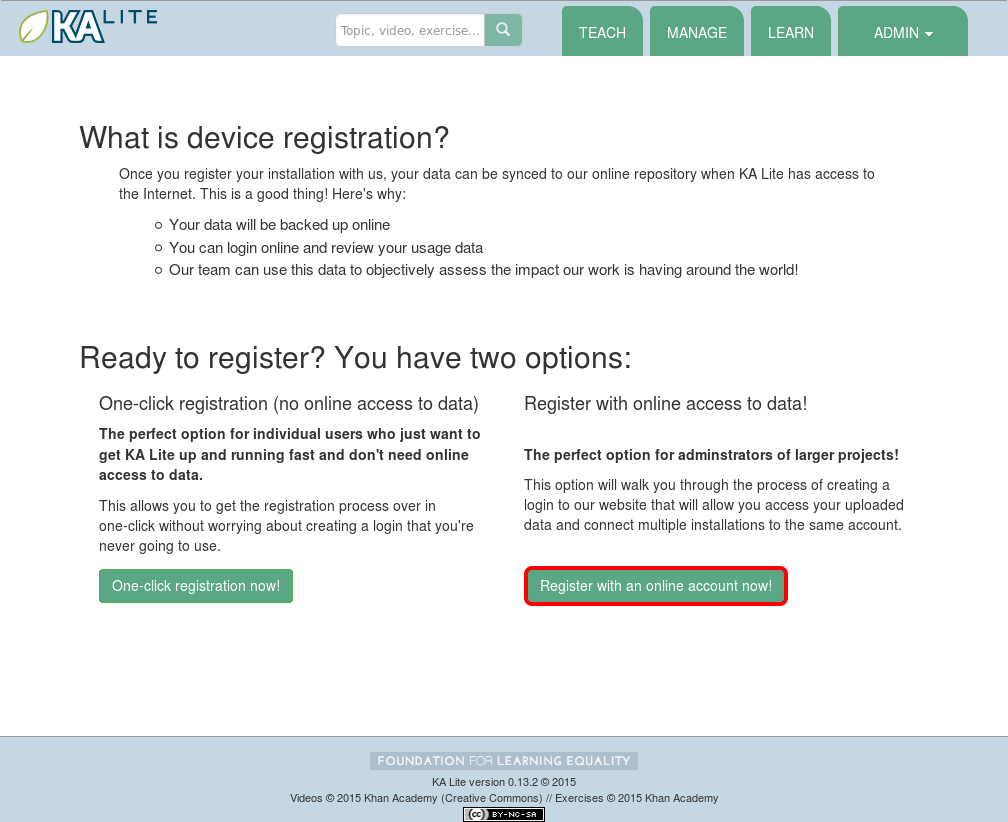
- If you have not already registered your device, you will be redirected to a page that shows you your options. Click the “Register with an online account now!” button to get started with the registration process.
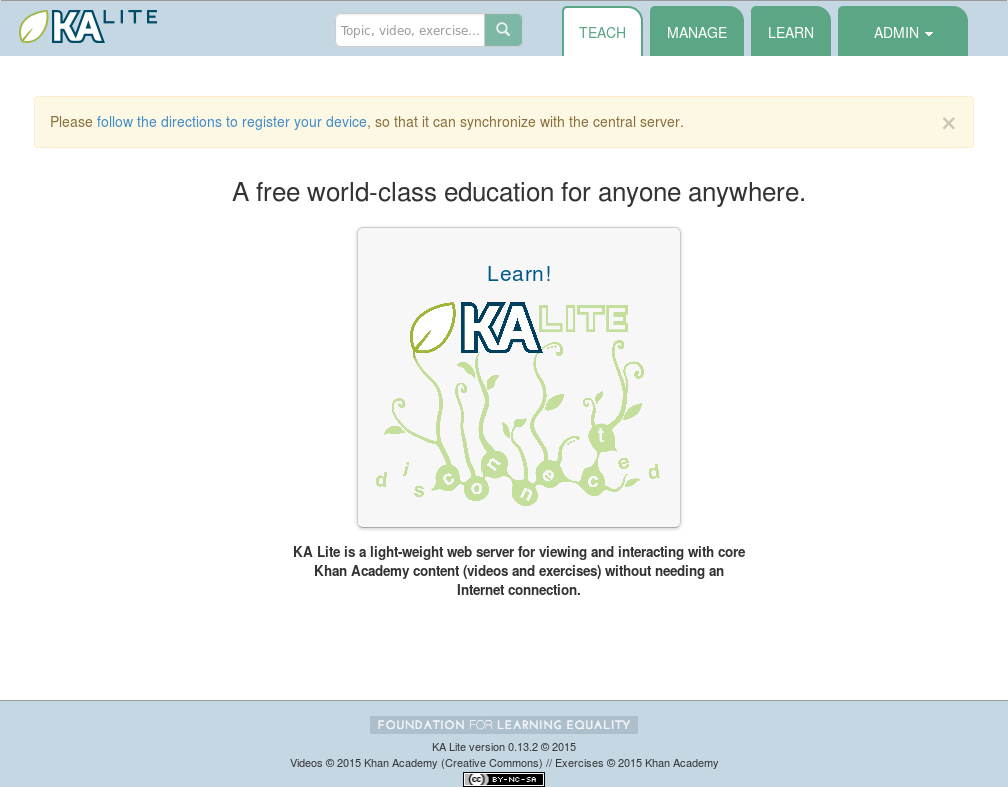
If you do not see this page, click on the “Manage” tab. At the top of this page, you should see a link to register your device. It should like like the following:

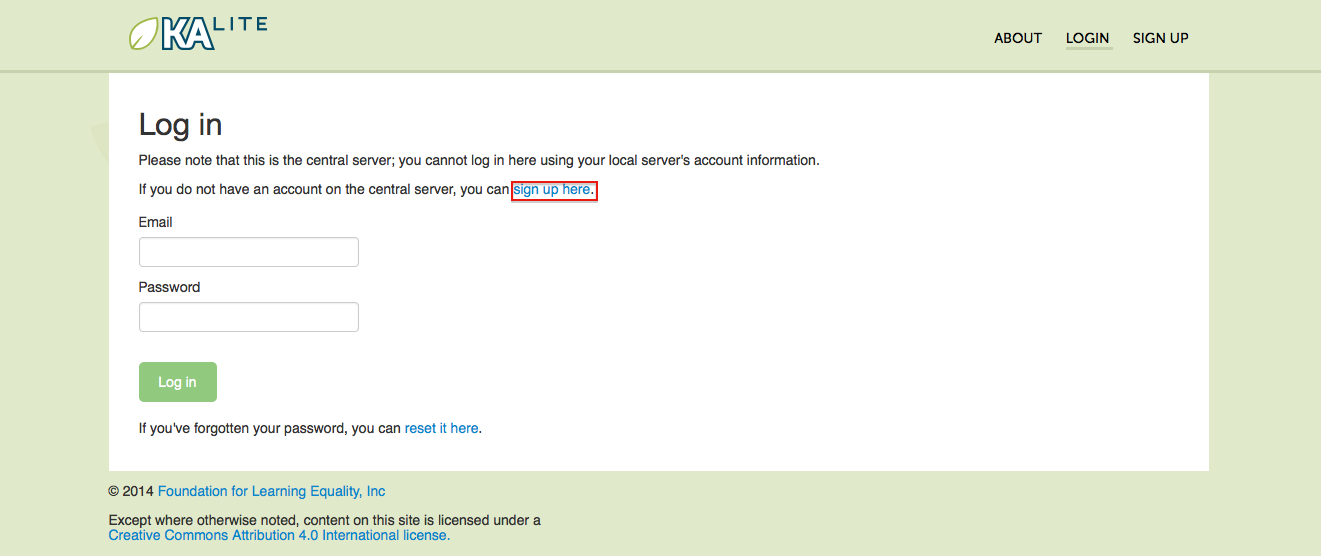
You will be prompted to log in with your central server login credentials. Please note that these credentials are different from your login credentials created during set-up. Click on the “Sign up here” link, and you will be redirected to a page that prompts you to create an account on the central server.
Once you have filled out the form and submitted it, you will be sent an activation link via the email address you supplied.
Post Registration Setup
Now that you have registered successfully, it’s time to configure your local KA Lite installation to suit your needs. If any terms like ‘facility’ or ‘device’ become confusing, feel free to reference the Administrator Glossary for a quick reminder.
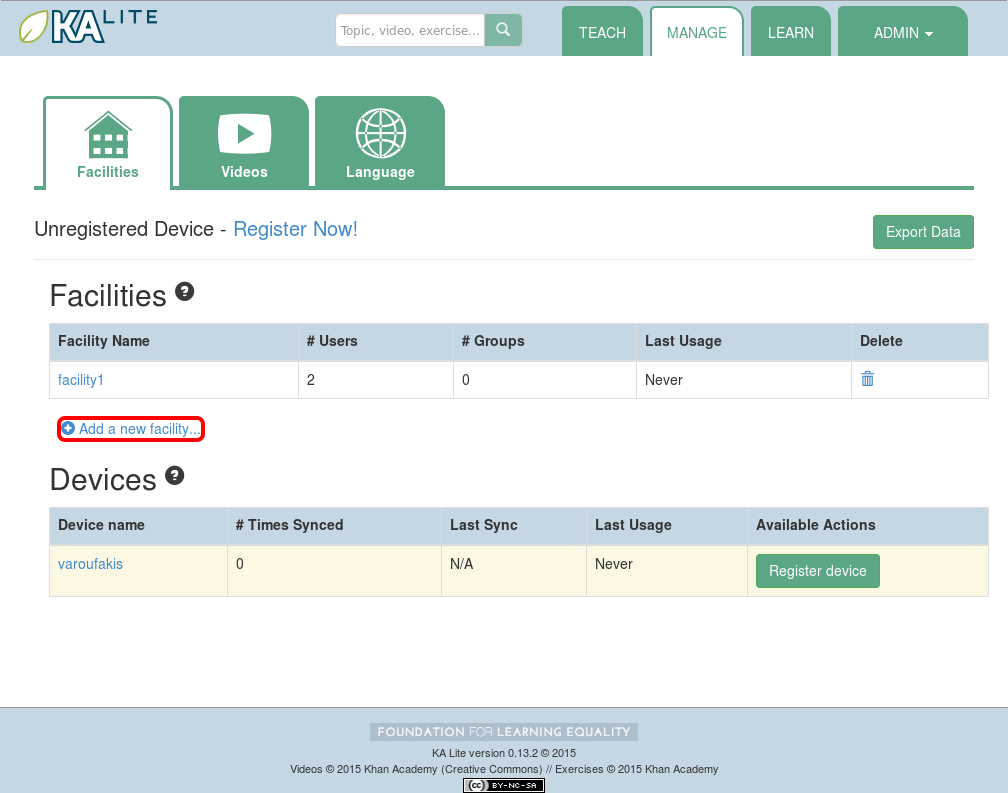
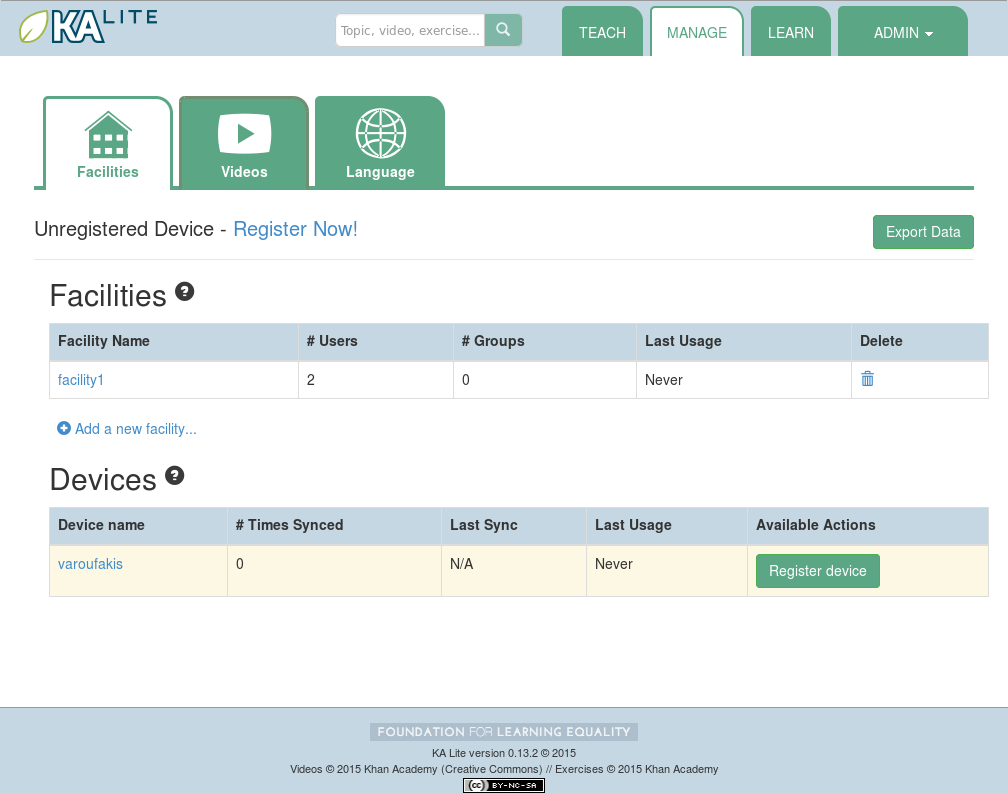
Create a Facility
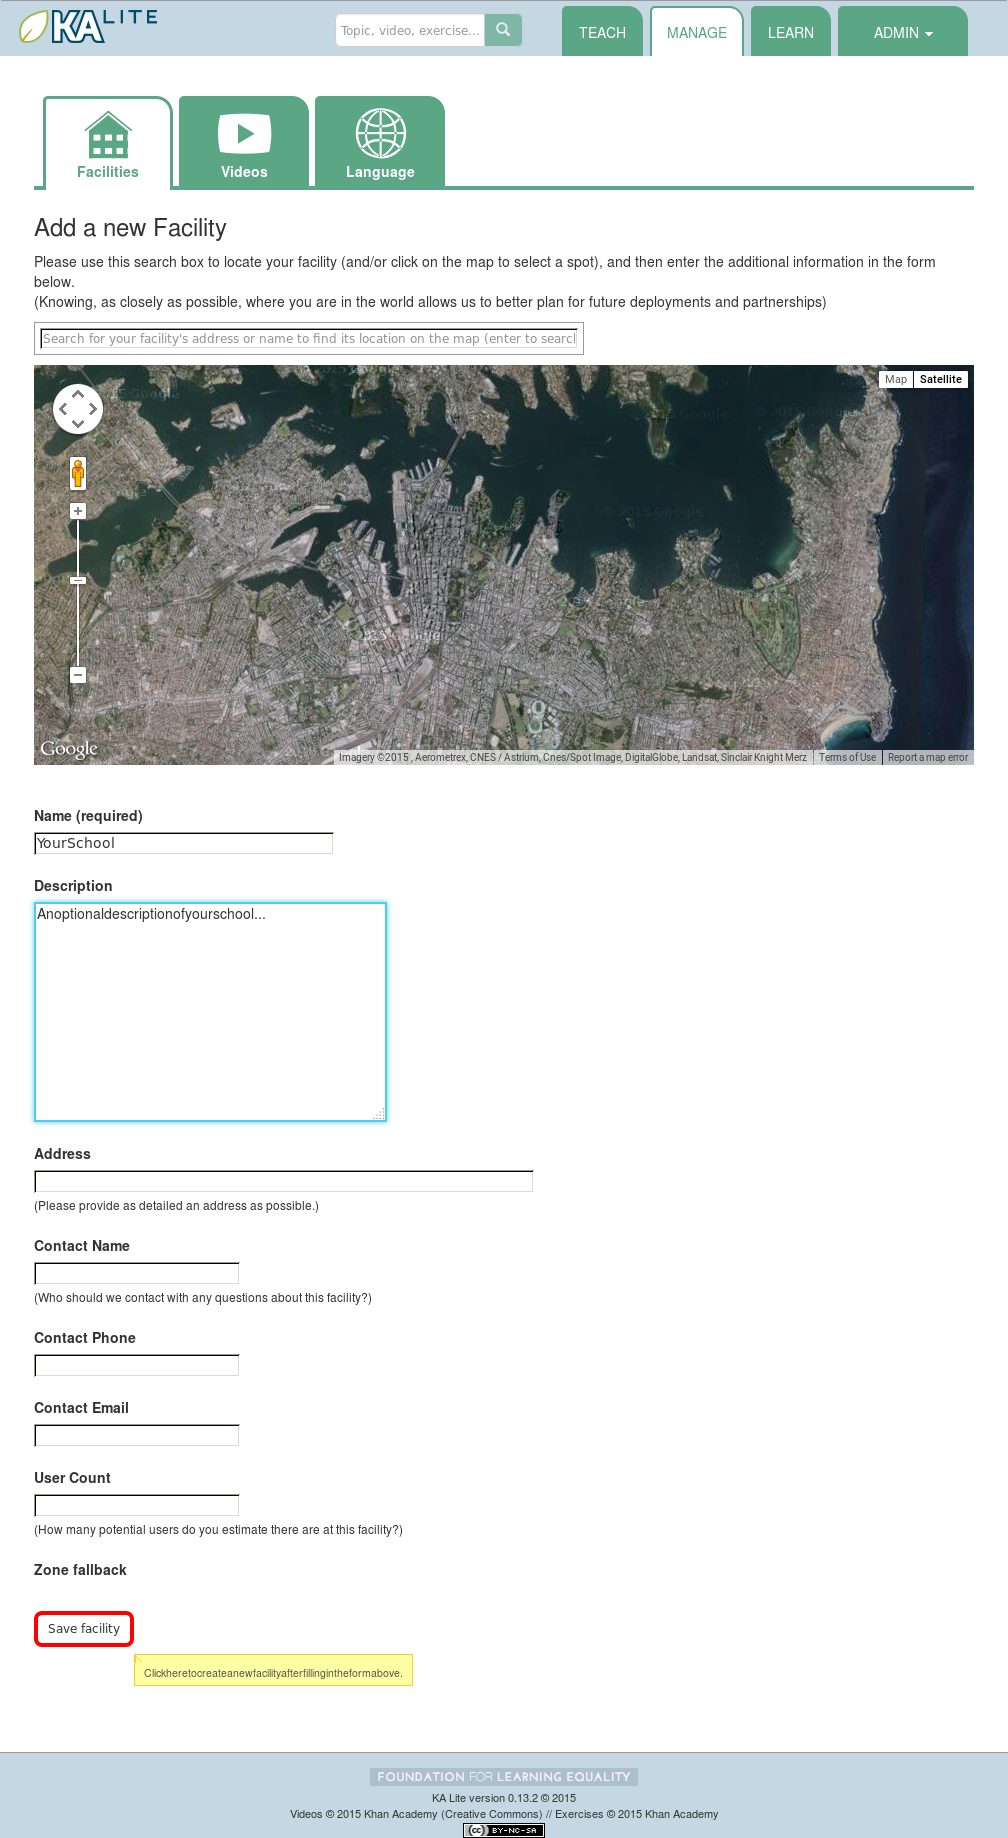
KA Lite assumes that you are going to be using the software primarily in one place. This could be a school, a home, a community center, etc. We call this place a “facility”, and use it to help differentiate users who are syncing back data with our central data hub. In order to create a facility, follow the steps below.
- Log in to KA Lite.
- Click the “Manage” tab at the top of the page.
- Make sure that the “Facilities” tab is selected.
- Under the Facilities section, click on “Add a new facility...”
- Fill in the information for all the fields you find below the map
- Click the “Save facility” button when you are finished.
- Once the information has been saved, you will be redirected back to the “Facilities” page, where you will see a message indicating that you have successfully saved your new facility.
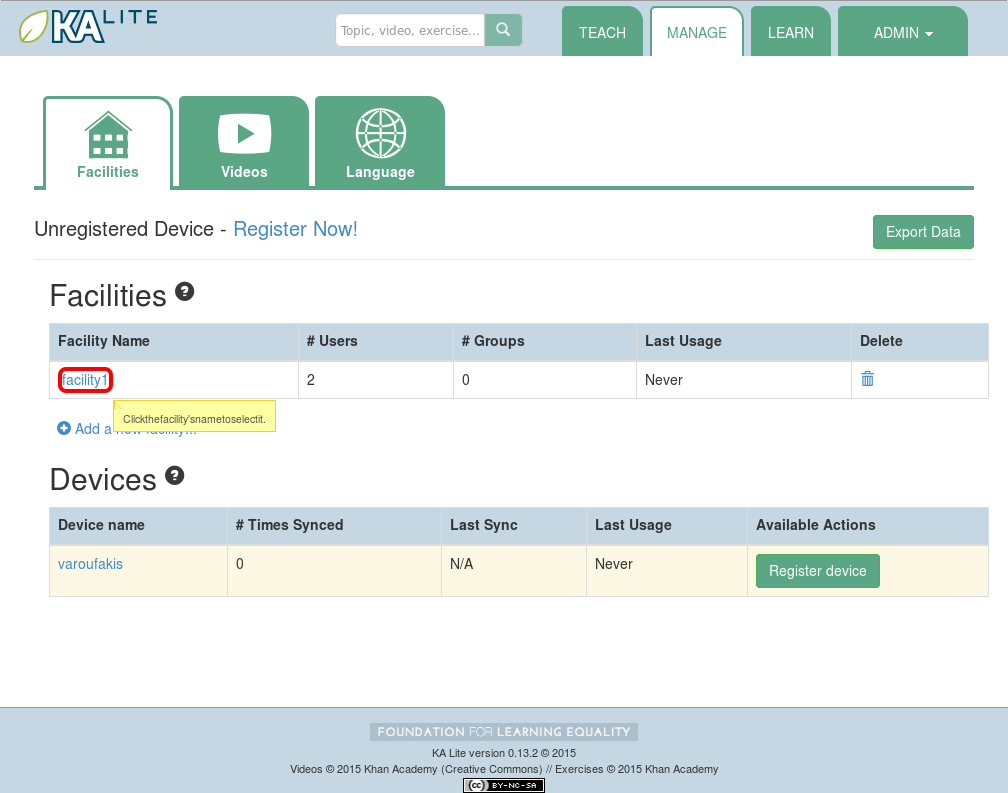
Delete a Facility
- Log in to KA Lite.
- Click the “Manage” tab at the top of the page.
- Make sure that the “Facilities” tab is selected.

- Find the facility you would like to delete, and click the trash can icon to delete the facility.
- You will be prompted to type in the name of the facility you wish to delete for confirmation.
- If your delete is successful, you will be redirected back to the “Facilities” page, where you will see a message indicating that you have successfully deleted the facility.
User Management
Coaches and learners are the other types of users that KA Lite supports. In order for them to be able to login, you need to create accounts for them.
Adding Learners
- Log in to KA Lite.
- Click on the “Manage” tab at the top of the page.
- Make sure that the “Facilities” tab is selected.
- Select the facility that the learner will belong to.
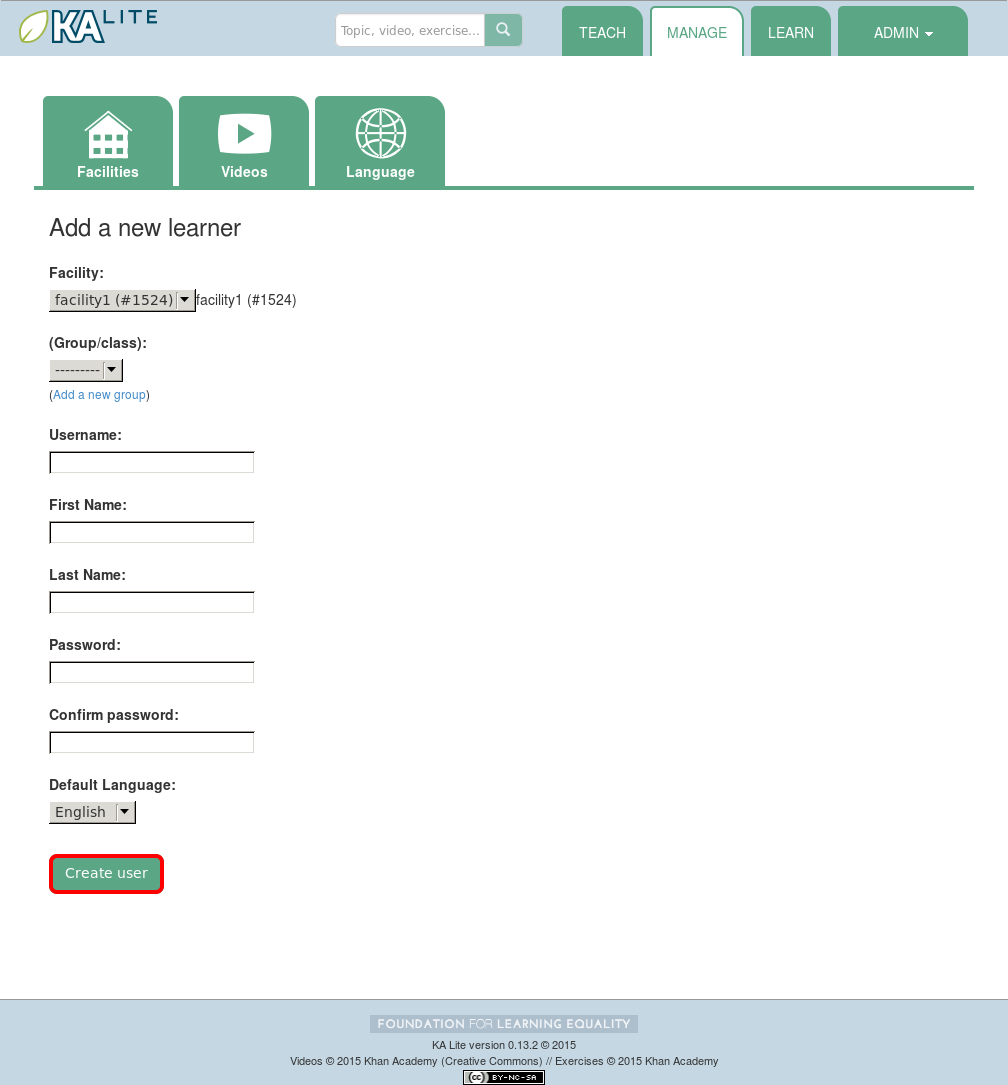
- Under the “Learners” header, click on “Add a new Learner”.
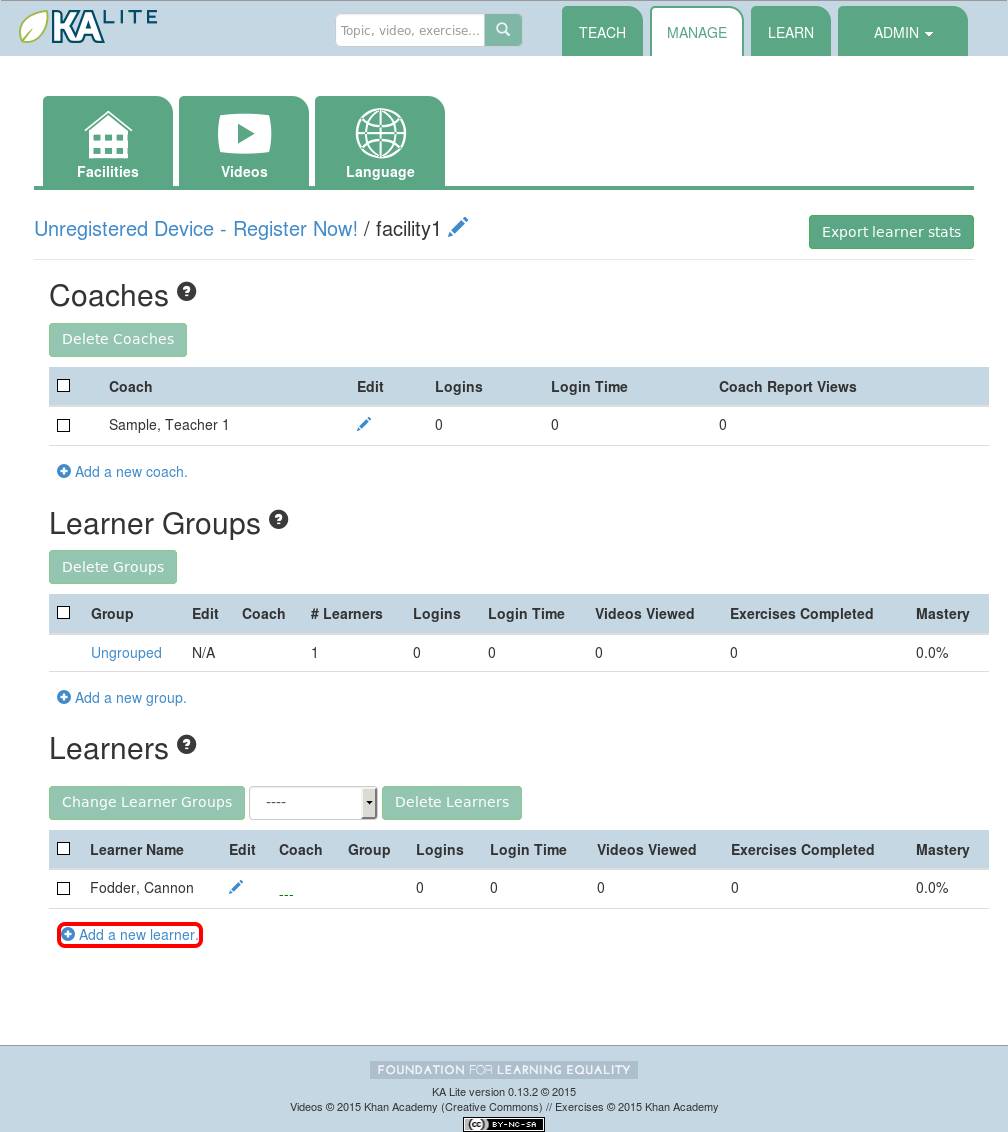
- You will be redirected to a page that says “Add a new Learner”. Fill in all the information. The facility dropdown defaults to the facility you selected in the previous steps.
- Click “Create user”. You should be redirected to the “Facilities” page, where you will see a message indicating that you have successfully created a Learner user.
Permanently Deleting Learners
- Log in to KA Lite.
- Click on the “Manage” tab at the top of the page.
- Make sure that the “Facilities” tab is selected.
- Under the “Facilities” header, select the facility the Learner belongs to.
- Under the “Learners” header, mark the box to the left of the Learner account you would like to delete.

- Press the “Delete Learners” button.

- You will be prompted with a confirmation of your deletion. Press “OK” to proceed with the deletion.
Adding Coaches
- Log in to KA Lite.
- Click on the “Manage” tab at the top of the page.
- Make sure that the “Facilities” tab is selected.
- Select the facility that the coach will belong to.
- Under the “Coaches” header, click on “Add a new coach”.
- You will be redirected to a page that says “Add a new coach”. Fill in all the information. The facility dropdown defaults to the facility you selected in the previous steps.
- Click the “Create User” button.
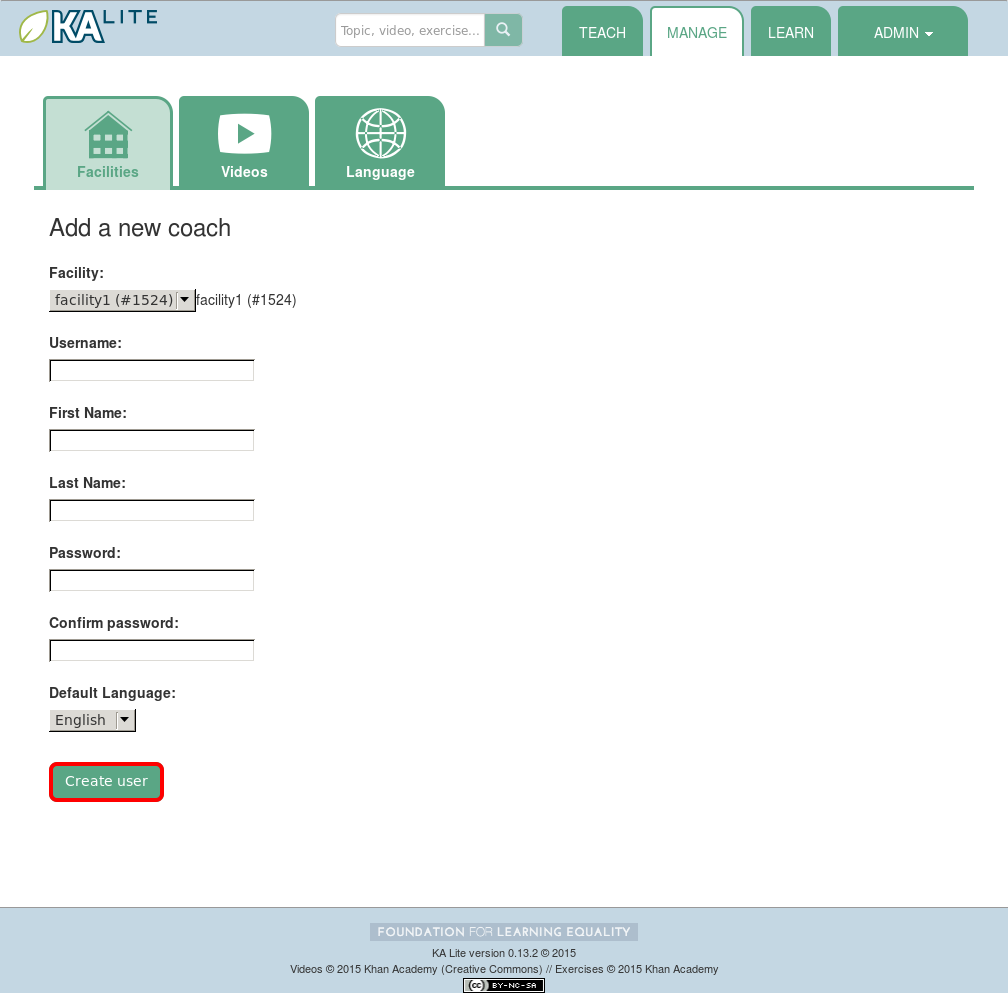
- If the user was successfully created, the page will reload with a message indicating that you have created the user.
Permanently Deleting Coaches
- Log in to KA Lite.
- Click on the “Manage” tab at the top of the page.
- Make sure that the “Facilities” tab is selected.
- Under the “Facilities” header, select the facility the coach belongs to.
- Under the “Coaches” header, mark the box to the left of the coach account you would like to delete.

- Press the “Delete Coaches” button.

- You will be prompted with a confirmation of your deletion. Press “OK” to proceed with the deletion.
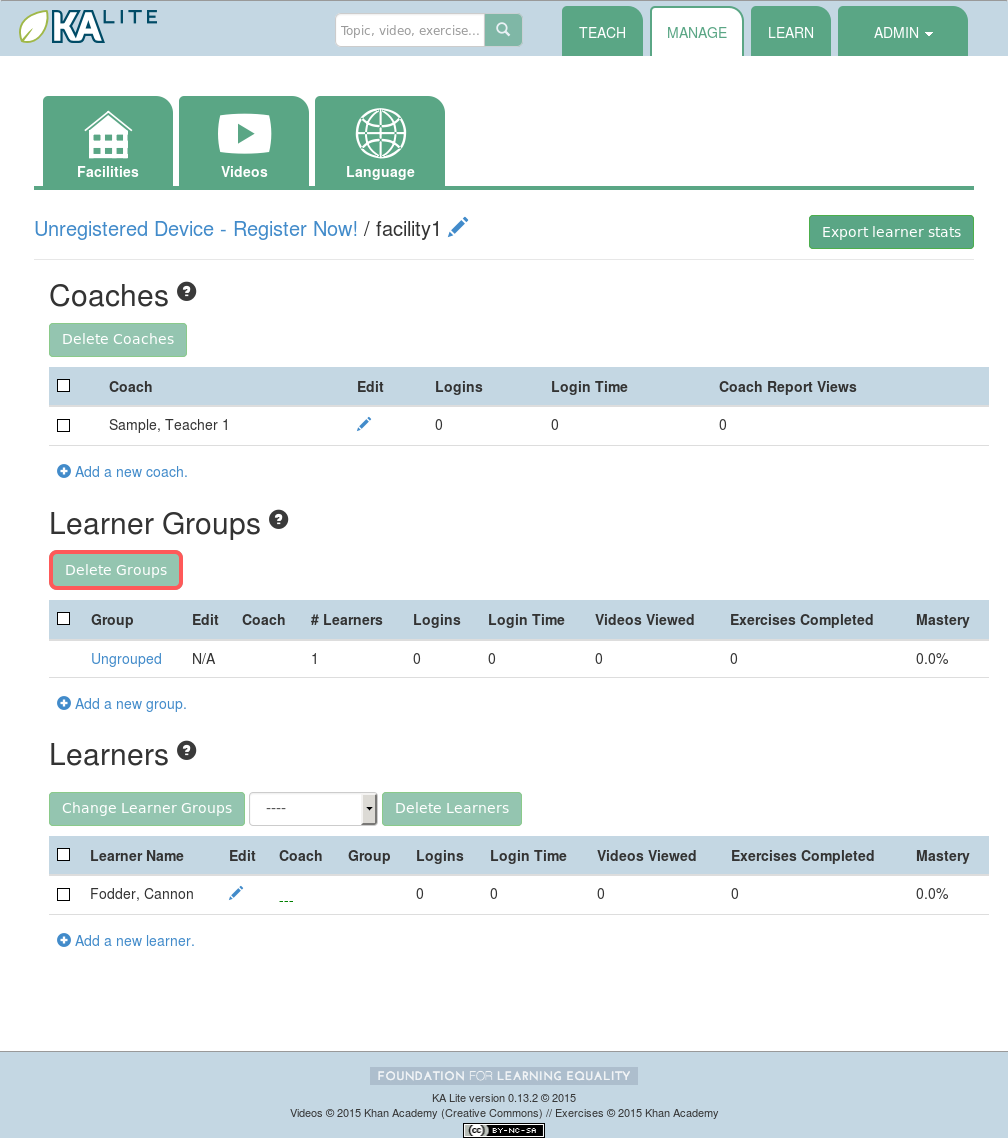
Adding a Group
You can create groups within a facility. Each group can represent a classroom, a study group, or any other way you would like to group Learners. To create a group, follow the instructions below:
- Log in to KA Lite.
- Click on the “Manage” tab at the top of the page.
- Make sure that the “Facilities” tab is selected.
- Select the facility that the group will belong to.
- Under the “Learner Groups” header, click on “Add a new group”.

- Fill out the name of the group, and provide a description.
- Click “create group”.
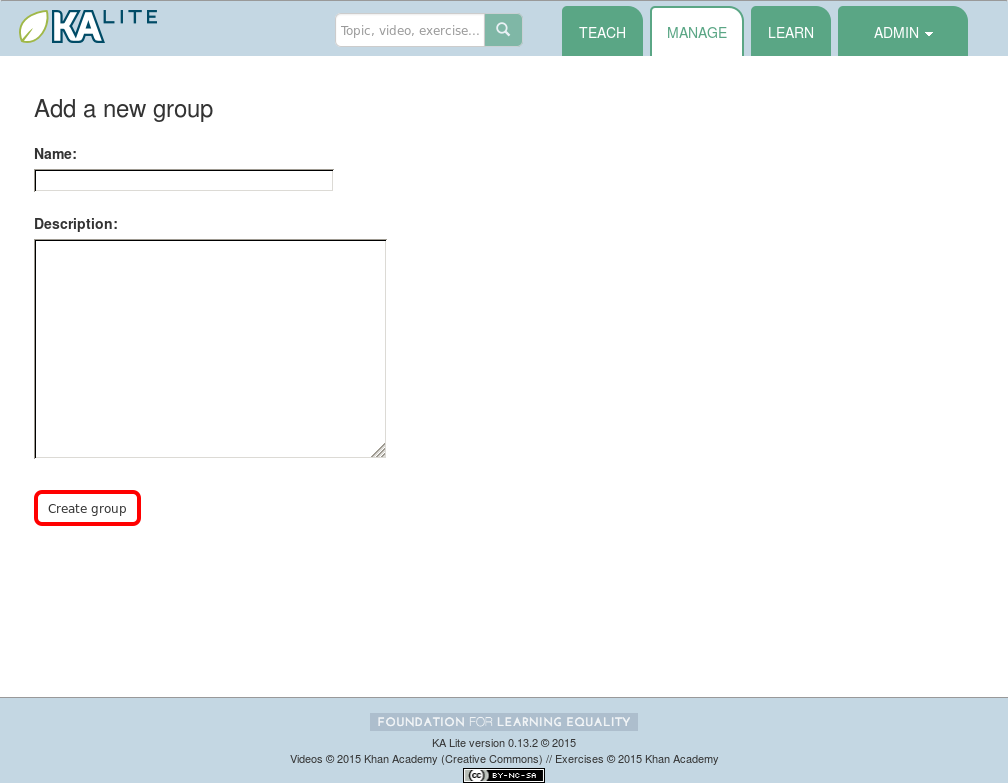
- You should be redirected back to the page for the facility. If the group was successfully created, you will see it listed under the “Learner Groups” section.
Deleting a Group
- Log in to KA Lite.
- Click on the “Manage” tab at the top of the page.
- Make sure that the “Facilities” tab is selected.
- Select the facility that the group you would like to delete belongs to.
- Mark the box to the left of the group you would like to delete.
- Press the “Delete Groups” button under the “Learner Groups” header.
- You will be prompted with a confirmation of your deletion. Press “OK” to proceed with the deletion.
Moving a User to a New Group
- Navigate to the page for the facility the user belongs to.
- Under the “Learners” header, select the Learner you would like to move by clicking in the checkbox to the left of the Learner name.

- In the dropbox, select the group you would like to move the user to.
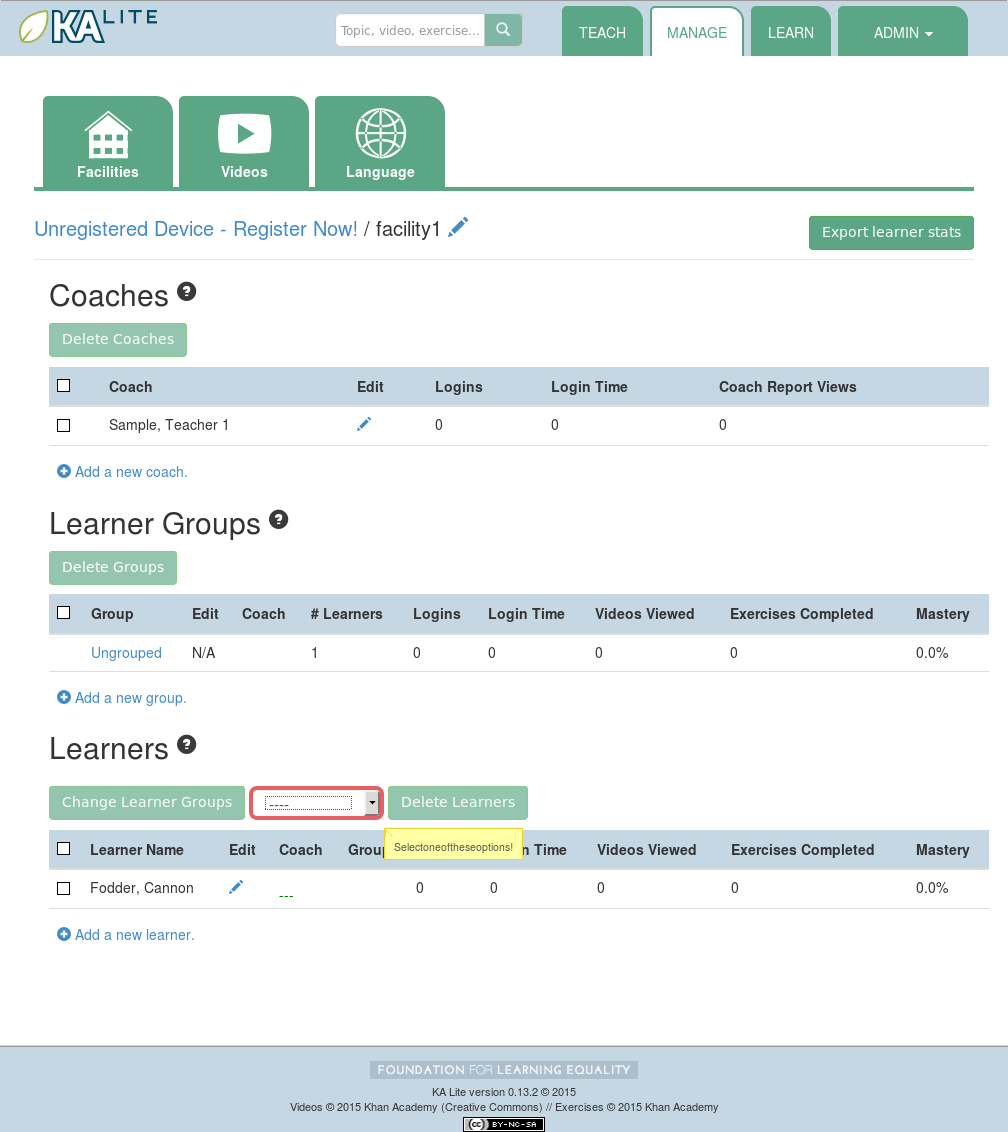
- Click the “Change Learner Groups” button.

- The page will refresh, with a message at the top indicating a successful move.
Removing Users from a Group
If you’d like to remove a user from a group without permanently deleting the user, please follow the instructions below:
- Follow the same instructions as for “Moving a User to a New Group”, but select “Ungrouped” from the dropdown menu.
Group Summary Statistics
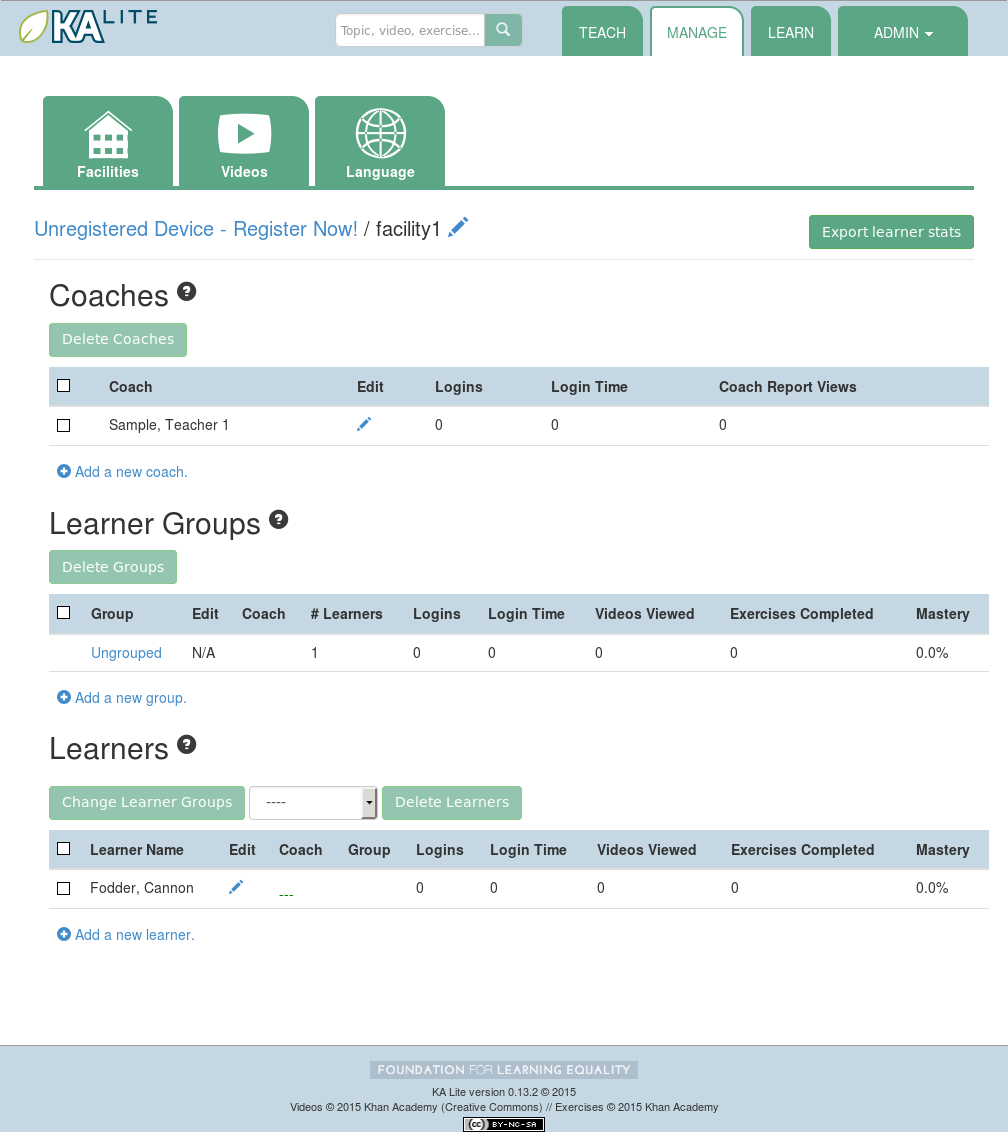
For each group, you should be able to view some statistics.
- Navigate to the Learner Groups section of the facility you wish to look at.
- Click on the group that you wish to view.

- The statistics for the group should be displayed at the top of the page.
Edit User Information
- Navigate to the page for the facility that the user belongs in.
- Find the user you would like to edit.
- Click the blue pencil
 icon next to the name of the user that you would like to edit.
 - Make all necessary changes on the edit user page, and click “Update user”.
- You will be redirected to the previous page, with a message at the top indicating that your changes have been saved.
Allowing Other Users to Connect
In order for other users to be able to connect to the KA Lite server with a different machine, you will need to give them an IP address with which to access the software. This should be different from the IP address given to you during setup (127.0.0.1:8008).
Downloading Videos
Now that you’ve created a facility and user accounts, it’s time to add video content to your local KA Lite installation! Since the videos can take up a large amount of space, you can choose to download only the videos that you need. If your device has enough space and you wish to download all of the videos, we recommend skipping to Downloading Videos in Bulk .
Downloading Individual Videos
After registering your device: 1. Click the “Manage” tab at the top of the page. 2. Click on the “Videos” tab.
- View subtopics by clicking on the ‘+’ symbol to the left of a subject of your choice. You can close them by clicking on the ‘-‘ symbol.
- Mark the content you wish to download by clicking the checkbox to the left of the content name.
- Click the green “Download” button in the top left box of the page. The button should also show you the total number of videos you have selected to download, as well as the total size of the content.
- Once the download is completed, video content will be ready for Learners to watch!
Downloading Videos in Bulk
If you want to download videos in bulk, your best option is to download the KA Lite videos through the BitTorrent Sync client. This will be a much faster process than using the KA Lite app to download all of the videos.
We have made the full set of KA videos (in the format needed by KA Lite) available via BitTorrent Sync (btsync). Note that this is different from BitTorrent; btsync allows us to add new videos or fix problems without issuing a whole new torrent file, and then having seeders split between the old and new torrent files. Here are the steps to set this up:
- Download and install BitTorrent Sync.
- Run btsync. On some platforms, this will bring up a graphical interface. On Linux, you will need to type http://127.0.0.1:8888/ into the address bar of your browser to get the interface.
- Click the “Enter a key or link” button, and enter BT7AOITNAIP3X3CSLE2EPQJFXJXMXVGQI
- Select the “content” folder inside your KA Lite installation as the “location” (unless you want the videos to be located elsewhere).
- Allow the videos to sync in there from your peers! It may take a while for now, as we don’t yet have many seeders on it. On that note – please help seed by keeping it running even after you’ve got all the videos, if you have bandwidth to spare! This will make it easier for others to download the content as well.
These are resized videos. All in all, this will take around 23 GB of space.
Warning
If you chose to download them to somewhere other than the content folder inside the ka-lite folder as recommended above, you need to tell KA Lite where to find them. If this is the case, follow the steps below:
Make sure all video files are located in a single directory, with .mp4 extensions (KA Lite expects this!)
If it doesn’t already exist, create a file named local_settings.py in the ka-lite/kalite folder (the one containing settings.py)
- Add the line
CONTENT_ROOT="[full path to your videos directory]", making SURE to include an OS-specific slash at the end (see examples) and encapsulate it in quotes. For example, on Windows:
CONTENT_ROOT="C:\\torrented_videos_location\\"For example, on Linux:
CONTENT_ROOT="/home/me/torrented_videos_location/"
- Add the line
Restart your server. If you are unsure on how to do this, please see Restarting Your Server .
Language Packs
KA Lite supports internationalization. You can download language packs for your language if it is available. A language pack comes with all the available subtitles and user interface translations for that language. When it is installed, KA Lite will give you the option to download individual dubbed videos from the language’s Khan Academy YouTube channel.
Download Language Packs
To download language packs:
- From the “Manage” page, click on the “Language” tab.
- Select the language pack you wish to download by selecting from the drop-down menu.
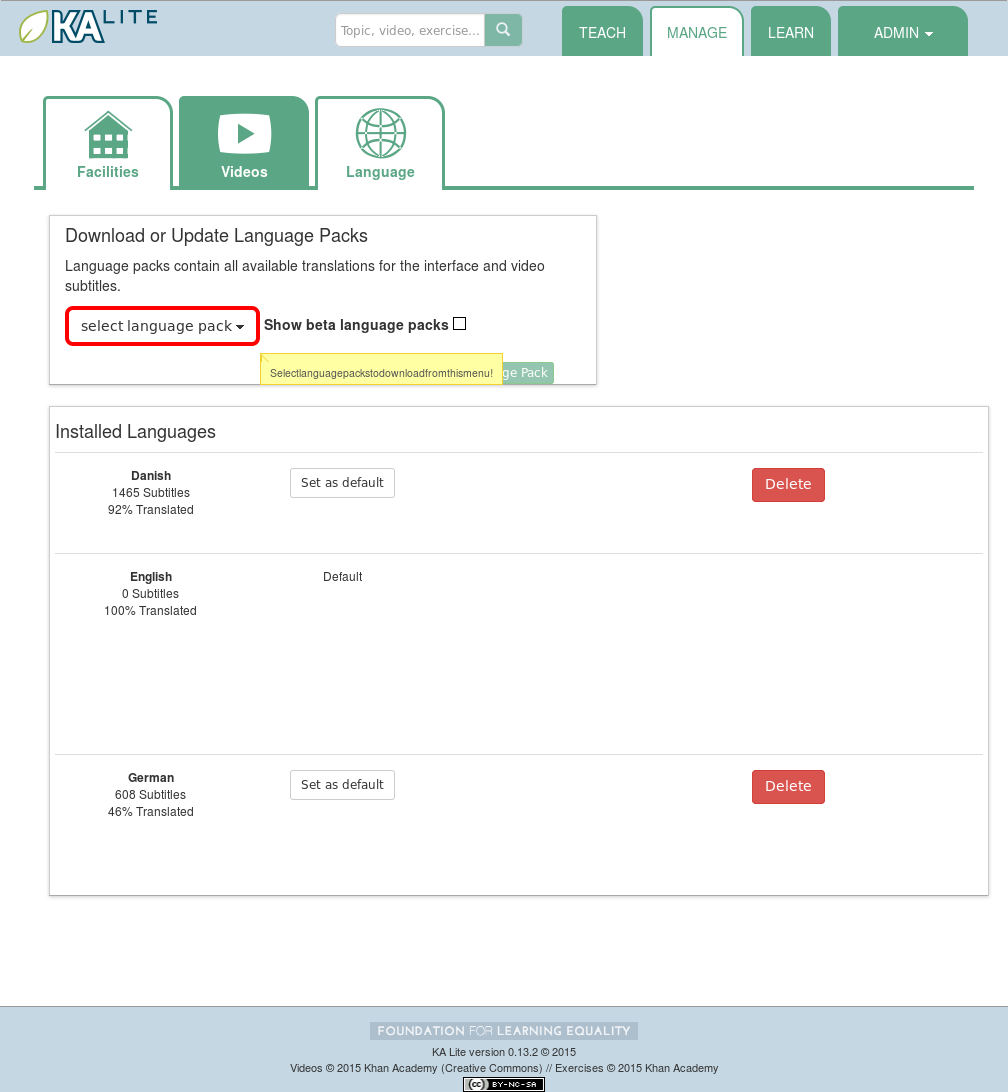
- Click the “Get Language Pack” button.
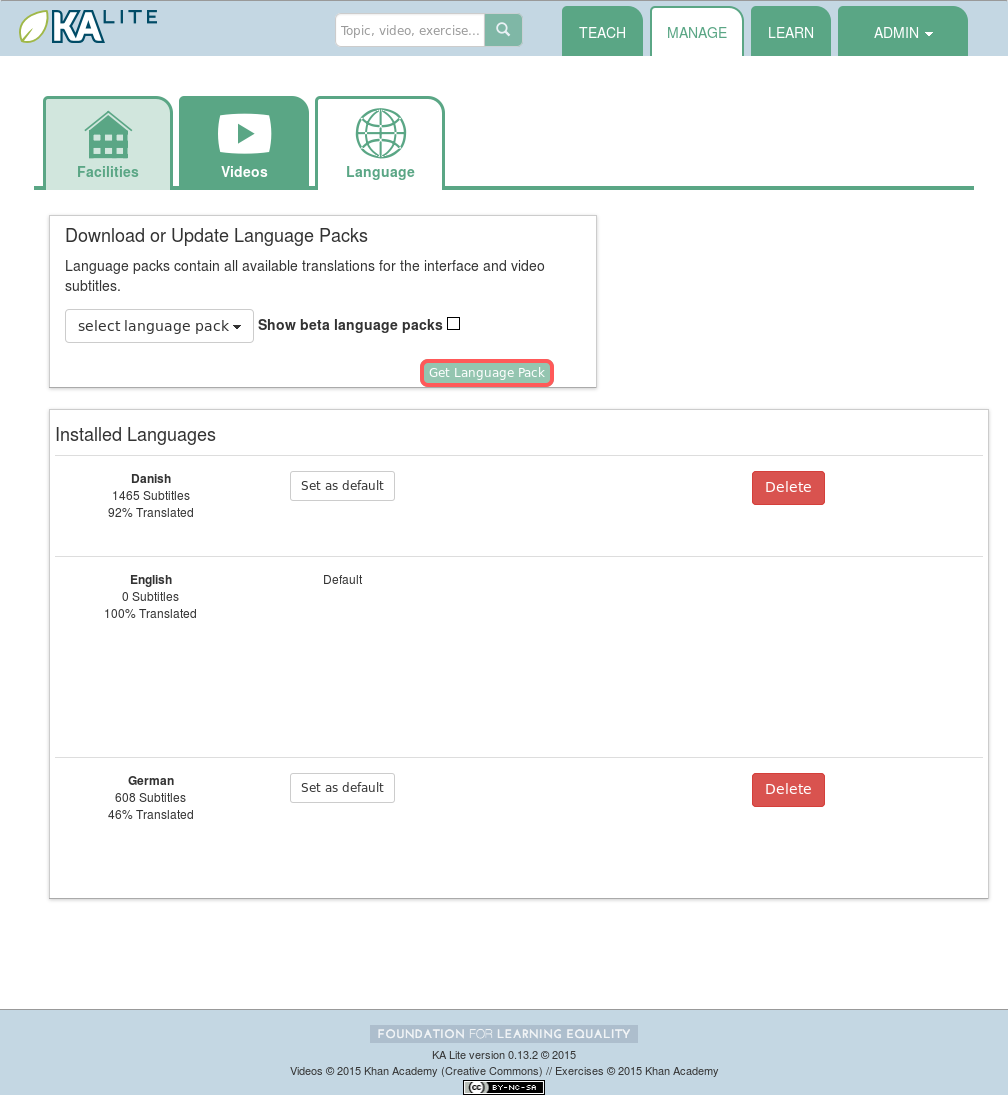
- Once the download finishes, you can see your language pack in the list of installed packs. Learners and coaches will now be able to switch their language to any of the installed language packs. Their default will be the default that you set by clicking on “Set as default”.
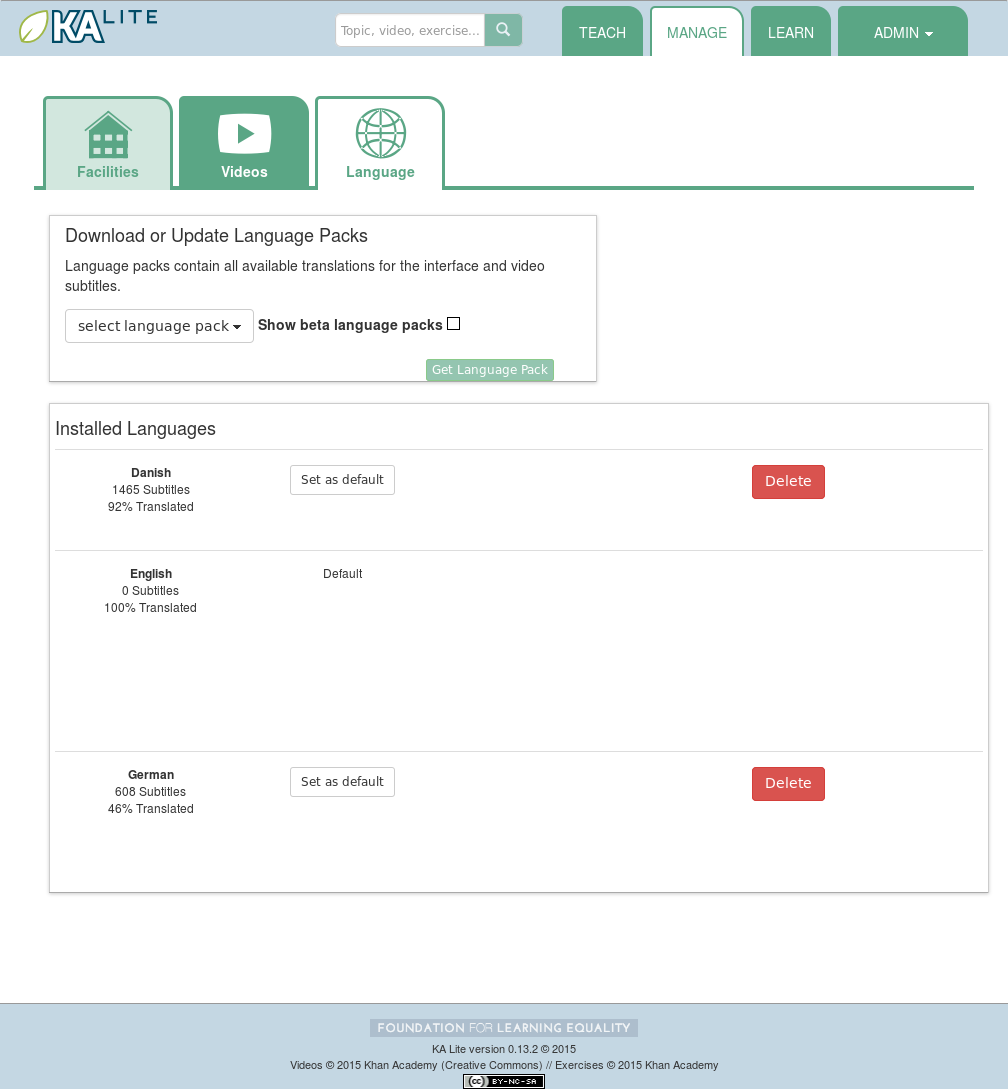
Delete Language Packs
To delete language packs:
- Log in as the administrator.
- Click the “Languages” link in the navigation bar
- In the Installed Languages section, there is a button for deletion of each language.
Restarting Your Server
If you have made some configuration changes (such as changing the filepath to your video content to your liking), or if you feel the need to reboot your KA Lite system, you may want to restart your server. Please note that this will cause KA Lite to become inaccessible to any users. However, this will not delete any user accounts or information that you have configured during set up.
This process varies, depending on which OS you are running the KA Lite Server on.
Restarting Your Server: Windows
In the system tray, right click on the KA Lite icon. Click the “Stop Server” item in the context menu. Right click on the KA Lite icon in the system tray again, and click “Start Server”. If the option is not clickable, wait a while and try again or restart your computer.
Restarting Your Server: Linux
- Open up your terminal. For most Linux distributions, you can do this by going to Menu -> Accessories -> Terminal or Applications menu -> System -> Terminal.
- Navigate to the folder that you downloaded KA Lite in. You can do this by typing
cd <PATH/TO/KALITE/FOLDER>. Change the path to the path name of the KA Lite folder on your machine. - Type in
bin/kalite restart. This should stop the server, then attempt to restart it again. The process may take up to a few minutes. - Once you see the script that begins with
To access KA Lite from another connected computer, try the following address(es):.... you will know that your KA Lite server has been successfully restarted.
Restarting Your Server: Mac
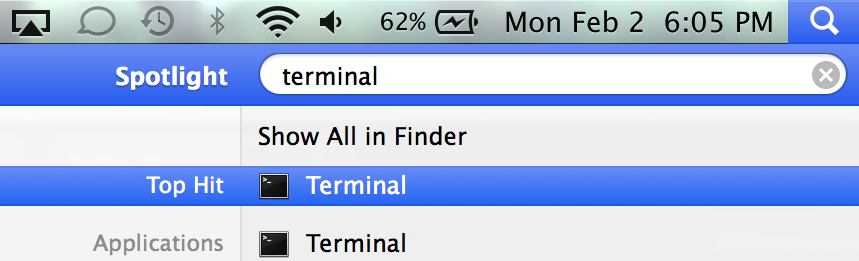
- Open up your terminal. You may do this by navigating to the magnifying glass
 at the top right corner of your screen, and typing in “Terminal”, then hitting “Enter” on your keyboard.
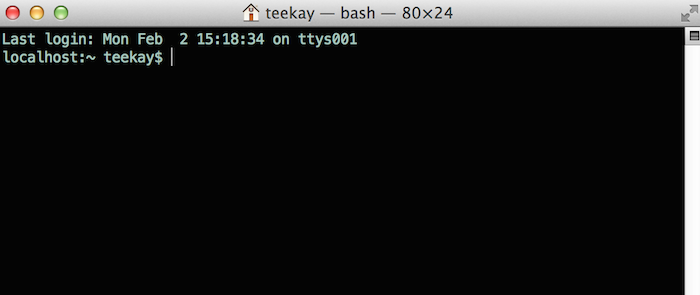
- Your terminal should be opened up. It should look a little something like the following:
- Navigate to the folder that you downloaded KA Lite in. You can do this by typing
cd <PATH/TO/KALITE/FOLDER>. Change the path to the path name of the KA Lite folder on your machine. - Type in
bin/kalite restart. This should stop the server, then attempt to restart it again. The process may take up to a few minutes. - Once you see the script that begins with
To access KA Lite from another connected computer, try the following address(es):.... you will know that your KA Lite server has been successfully restarted.
Updating KA Lite
If a new version of KA Lite comes out, you can update to the latest version by following the instructions below.
Updating on Mac OS and Linux
At this time, the only supported way to update is to grab the source and run the setup management command.
Follow the instructions in the installation guide to ensure you’re using the latest version.
Updating on Windows
To update on Windows, simply use our Windows installer. You will have the option to update from a prior version.
See the Windows installation guide.
Configuration Settings
Once you have deployed KA Lite to a computer, there are a number of ways you can customize the behavior of your installation. Below, you will find a list of these possible customizations with instructions or descriptions on how to do it.
Warning
Please follow these instructions carefully! Customizing the server incorrectly can break your installation. It can be very hard to find and undo the error.
A more advanced way to customize your installation’s behavior is by adding a file called local_settings.py in the kalite folder (the same folder that has version.py). Below is a list of options that you can set in local_settings.py, and what they mean. As of version 0.9.3 (Dec, 2012):
- CONTENT_ROOT = “<path to desired content folder>” (default=ka-lite/content) This is the path that KA Lite will use to look for KA Lite video files to play. Change the path to another local directory to get video files from that directory.
- TIME_ZONE = <desired time zone> (default = “America/Los_Angeles”) You can set this to be the local time zone for your installation. Choices can be found here.
- LANGUAGE_CODE = “<desired ISO 639-1 Language Code>” (default = “en-us”) You can set this to the desired language code for this installation (All choices can be found here). If there are translations available, our web server will show them in KA Lite. Soon, we hope to provide support for internationalized content inside the KA Lite interface.
- USE_I18N = <True or False> (default = True) If you set this to False, our web server will make some optimizations so as to avoid loading internationalization tools. Things might run a little faster, but you won’t have support for translated content.
- USE_L10N = True By default, this is set to False. If you set this to True, Django will format dates, numbers and calendars according to the current locale. For example, January 5, 2000 would be 1/5/2000 if locale = “en-us” and 5/1/2000 if locale = “en-gb”
New in version 0.10.0 (August 26, 2013):
- PRODUCTION_PORT = <desired port number> (default=8008) This is the port that KA Lite will run on when started. Here is a list of available ports.
- USER_LOG_MAX_RECORDS = <desired maxium for user log records> (default = 0) When this is set to any non-zero number, we will record (and sync for online tracking) user login activity, summarized for every month (which is configurable, see below). Default is set to 0, for efficiency purposes–but if you want to record this, setting to 1 is enough! The # of records kept are not “summary” records, but raw records of every login. These “raw” data are not synced, but are kept on your local machine only–there’s too many of them. Currently, we have no specific report to view these data (though we may have for v0.10.1)
- USER_LOG_SUMMARY_FREQUENCY = <desired frequency in the following format (number, amount of time)> (default = (1, “months”) This determines the granularity of how we summarize and store user log data. One database row is kept for each student, on each KA Lite installation, for the defined time period. Acceptable values are: (1, “months”), (2, “months”), (3, “months”), (6, “months”) - separate logged data for every month, 2 months, 3 months, or 6 months, respectively (1, “weeks”) - separate logged data for every week ** NOTE THIS MAY PRODUCE A LOT OF DATA **
- SYNC_SESSIONS_MAX_RECORDS = <desired max records of sync sessions> (default = 10) Every time your installation syncs data, we record the time of the sync, the # of successful logs that were uploaded and downloaded, and any failures. This setting is how many such records we keep on your local server, for display. When you log in to our online server, you will see a full history of these records.
- CRONSERVER_FREQUENCY = <desired frequency of cronserver to run in seconds> (default = 10 minutes) This is how frequently KA Lite tries to synchronize user data with other Devices on your Zone. This can be changed to sync data more often (use a smaller #), or if you’re never online (can be set to a large number)
- CACHE_TIME = <desired length of cache time, in seconds> (default = 5*365*24*60*60) (that’s 5 years!) Our basic topic pages, video pages, and exercise pages rarely change–only when you download new videos (changes made by user logins are made in a different way). Therefore, we can “cache” copies of these pages, to avoid constantly regenerating them, and speed up KA Lite. We have logic to delete the cached copies, and therefore generate new copies, if you download new videos or delete old videos through our interface. If you would like to disable caching, set CACHE_TIME = 0 . Read a little more about caching on Wikipedia.
- CACHE_LOCATION = ‘<path to cache directory>’ (default= dir named kalite_web_cache in the OS temporary dir) Some operating systems will clear the temporary directories when the system is rebooted. To retain the cache between reboots, an alternative location can be specified. (for example on Linix, “/var/tmp/kalite_web_cache”)
- CHERRYPY_THREAD_COUNT = <number of threads> (default=50) The CherryPy Webserver can handle multiple page requests simultaneously. The default is 50, but for slow or single CPU servers, performance will be improved if the number of threads is reduced. Minimum number of threads is 10, optimum setting for Raspberry Pi is 18.
- USE_MPLAYER = <True or False> (default = False) With this setting, if the browser is run from the same computer as the KA Lite server, then instead of playing the video in the browser, the video will be launched outside of the browser and played in mplayer - a light-weight video player that is included with the KA Lite software. This is intended for use only on the Raspberry Pi, where no other video player is available.
New in version 0.11.1 (March 12, 2014):
- LOCKDOWN = <True or False> (default = False) With this setting, users must be logged in order to access videos & exercises
- CONFIG_PACKAGE = “<Desired Config Package>” Allows enabling of different config packages to enable commonly requested custom behaviors. “UserRestricted” - Doesn’t allow users to sign up themselves
Finally, if you examine the various settings.py files in the app (there is more than one such file) you will frequently see variables set with the following syntax:
DEBUG = getattr(local_settings, "DEBUG", False)
This is essentially checking first to see if DEBUG is set in local_settings. If it is, use that, if not, set it to False. Any variable set with this syntax in settings.py can be overwritten in local_settings.py. Again, don’t change anything on a live installation that you aren’t sure about, but for testing purposes, feel free to experiment!