Raspberry Pi 3 Tutorial
Raspberry Pi has many versions and the latest one is Pi 3, which this guide is based on. It also works for other editions of The Pi - RPi1, 2, Nano, Zero etc. In order to have complete ka-lite installation one would need a 64GB MicroSD Card (earlier version may need a SD Card) as the reduced size video are currently 34GB in size (see System requirements).
Overview
Installing KA Lite on a Raspberry Pi by using the specialized
ka-lite-raspberry-pi package will install a couple of dependencies for
Raspbian. One of them is Nginx, a web server.
The main benefit of this setup is that static files are handled by Nginx, meaning all images, javascript files and videos are served by a more efficient application. In older more limited versions of Raspberry Pi, this was critical because of limited hardware.
Step 1: Install Raspbian
First step is to get Raspbian OS installed on Raspberry Pi. There are guides available on their website. Easy way
is to format the MicroSD Card as FAT32 and then download NOOBS (https://www.raspberrypi.org/downloads/noobs/)
Once downloaded extract and copy it on the MicroSD Card. Pi 3 has a inbuilt WiFi, hence put the Micro SD card and once
booted it will ask to connnect to your WiFi. If WiFi isn’t available make sure the ethernet port is connected and internet is
accessible. This is required to download the Raspbian OS.
After Raspbian is installed and booted, please upgrade the OS before installing the dependencies:
# Upgrade Raspbian OS
sudo apt-get update
sudo apt-get upgrade
Step 2: Install KA Lite
You will need the customized package ka-lite-raspberry-pi. To get the latest
version, see Raspberry Pi.
You can also add the PPA, see Debian/Ubuntu: Subscribe to updates through a PPA, and then
run sudo apt-get install ka-lite-raspberry-pi.
Upgrades
To upgrade KA Lite on Linux, simply download the latest deb file and install it on top of the old one (following the same installation instructions). If you use a PPA, you can run apt-get update && apt-get upgrade.
Your existing data will be preserved by default.
See the release notes for critical upgrade information for specific versions.
Configuration during installation or update
Some explanation:
1. Choose weather you want to run KA Lite on boot or not. We recommend choosing yes, as it simplifies data management. If you choose not to, you must manually start KA lite every time.
Note
Running KA Lite as different users creates different sets of data files, so it’s recommended that you run KA Lite as the same user every time.
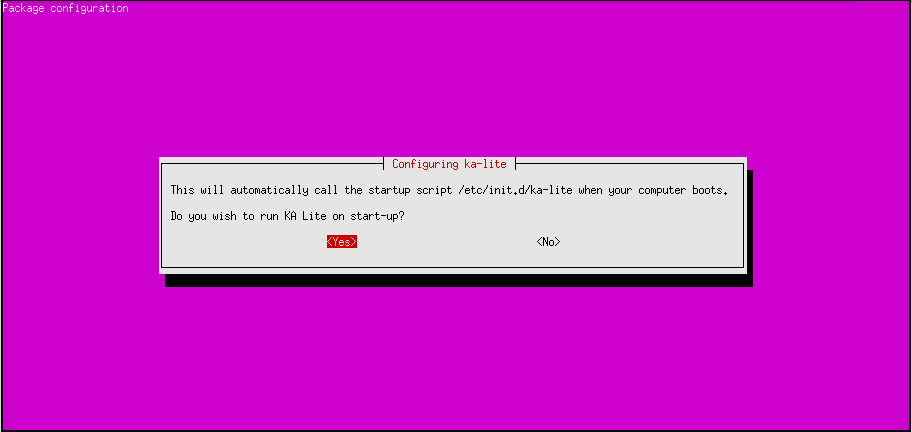
2. If you chose to start on boot in the previous step, you will be prompted to choose the owner for the KA Lite server process. Generally the default value is ok.

- You will be asked to review your choices, and finally KA Lite will start automatically when installation is complete.
Tip
If you want to receive automatic updates from online sources, you can also use Debian/Ubuntu: Subscribe to updates through a PPA.
During the setup it will ask to download the English content pack that has all exercises. It is also fundamental to all other language contents, and thus mandatory to run any kind of installation. This file is around 800MB and it will take time to download depending on the internet connection.
Step 3: Usage
You will probably have chosen to start KA Lite automatically, and if that’s the case, it will already be running. Use following command to start/stop KA Lite:
# Starting KA Lite
sudo service ka-lite start
# Stopping KA Lite
sudo service ka-lite stop
After starting KA Lite, point your browser to http://127.0.0.1:8008 and you
should see a screen where you can type in your administrator’s password.
Step 4: Downloading the videos
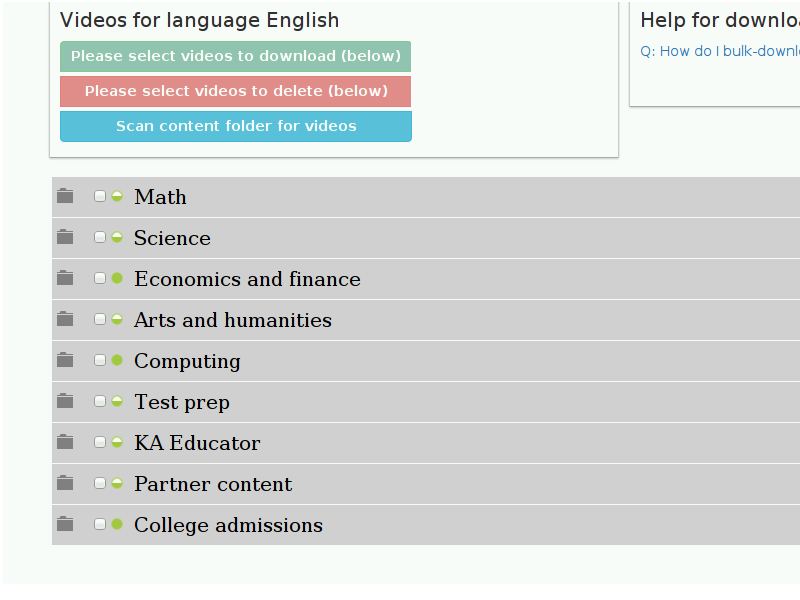
If videos are downloaded in bulk, then they need to be moved to the folder /home/pi/.kalite/content. After copying the files, use the Scan content folder for videos. The tree will turn green for all the videos that are available in the content folder. Time taken for the scan to complete depends on the number of videos in the content folder. For the complete set of downloaded videos (34 GB), it can take more than 2 hours on Raspberry Pi 3. It may take longer for older versions of Raspberry Pi.
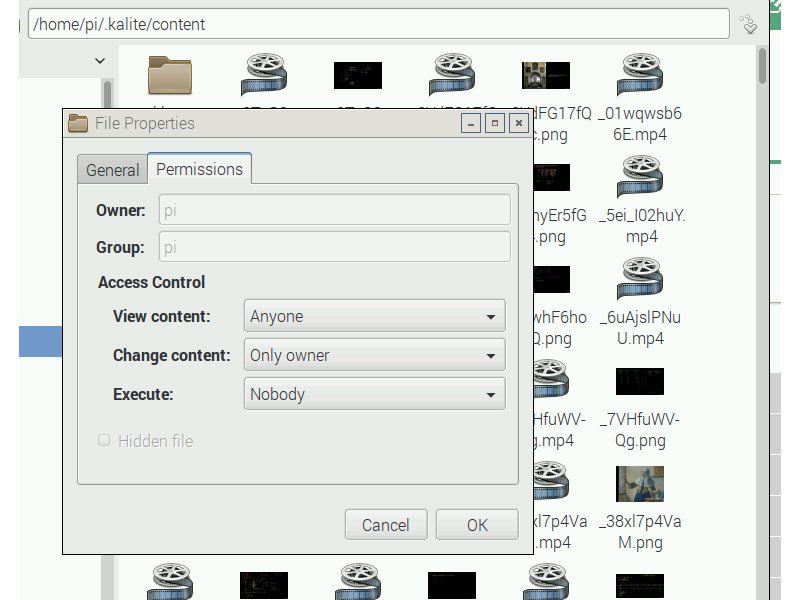
Please make sure that all these files once copied, they have permissions to be viewed by everyone (or at least the user account you know is running the KA Lite service, typically the pi user). If correct permissions are not given, videos will not play.
Step 5: Replication to other devices
Here are the basic steps to manually replicate from one KA Lite device to another. We advice you to write your own scripts to automate this process if you are deploying to more than just a couple of devices.
Prepare the seed device, your prototype using the above steps. Then:
Download and install all desired videos and content packs.
To remove the data that should NOT be replicated to other devices, run:
kalite manage clearuserdataTo run the same command as a different user:
sudo su -l USERNAME -c kalite manage clearuserdataCopy the
~/.kalitefolder to a removable device. It’s likely NOT going to save you time to compress it to .zip or .gz.On the target device:
- Install KA Lite using the steps above.
- Stop kalite:
sudo service ka-lite stop- Remove the whole
~/.kalitefolder- Copy in the
.kalitefrom your seed device to your target device’s HOME (~/) folder.- Make sure permissions are given to the
piuser (or other configured user)- Start kalite:
sudo service ka-lite start
After this, the target device should have the same content packs, videos etc. But it will be unregistered. Depending on your deployments internet connectivity, you may want to register it before deploying it.
In any case, you should always manually test a device before deploying it.